
Containers
Why Containers?
Even for moderately complex projects, the size of the software dependency stack can be huge. Take for example a simple pipeline to build a pdf report for an analysis scripted in R using Rmarkdown. To make this reproducible, not only (i) the respective R packages need to be installed and (ii) the R version needs to be the same, but also (iii) the versions of pandoc and LaTeX need to be exactly the same as during runtime.
Instead of trying to resolve these dependencies via a package manager (such as conda) which also depends on all required software being available in a single package manager, it might be easier to simply create a snapshot of the entire computing environment including all dependencies. These computing environments are then self-contained, hence the name 'containers'.
What are containers?
Containers allow a researcher to package up a project with all of the parts it needs, such as libraries, dependencies, and system settings and ship it all out as one package. Anyone can then open up a container and work within it, viewing and interacting with the project as if the machine they are accessing it from is identical to the machine specified in the container - regardless of what their computational environment actually is. They are designed to make it easier to transfer projects between very different environments.
In a way, containers behave like a virtual machine. To the outside world, they look like their own complete system. But unlike a virtual machine, rather than creating a whole virtual operating system plus all the software and tools typically packaged with one, containers only contain the individual components they need in order to operate the project they contain. This gives a significant performance boost and reduces the size of the application.
Containers are particularly useful way for reproducing research which relies on software to be configured in a certain way, and/or which makes use of libraries that vary between (or don't exist on) different systems. In summary containers are a more robust way of sharing reproducible research than, for instance, package management systems or Binder because they reproduce the entire system used for the research, not just the packages explicitly used by it. Their major downside is that due to their greater depth they are conceptually more difficult to grasp and produce than many other methods of replicating computational environments.
Ben Corrie give as reasonably accessible overview on core concepts in 'What is a container?'.
What are images?
Images are the files used to generate containers. Humans don't make images, they write the recipes to generate images. Containers are then identical copies instantiated from images.
Think of it like this:
- A recipe file a human writes contains all the steps to generate a working version of the project and its computational environment, but no actual materials. Think of this as like a blueprint.
- Building an image takes that recipe and using it assembles all the packages, software libraries, and configurations needed to make the fully fledged project and environment and bundles them up in a condensed lump. Think of images like a bit of flat pack furniture made using the blueprint.
- Containers take that image and assemble a full working version of the project and the environment needed to run it. Think of this as assembling the bit of flat pack furniture.
So if a researcher wants to allow others to reproduce their work they would need to write a recipe file, and use it to build an image of their project. They can then share this image file with anyone who wants to replicate their work. That person can then use the image to generate a container containing a working version of the project.
What is Docker?
There are a number of different tools available for creating and working with containers. We will focus on Docker, which
is widely used, but be aware that others such as Singularity also exist. Singularity is sometimes preferred for use on
HPC systems as it does not need sudo permissions to be run, while Docker does.
In Docker the recipe files used to generate images are known as Dockerfiles, and should be named Dockerfile.
Docker Hub hosts a great many pre-made images which can be downloaded and build upon, such as images of Ubuntu machines. This makes the process of writing Dockerfiles relatively easy since users very rarely need to start from scratch, they can just customise existing images. However, this does leave a user vulnerable to similar security issues as were described in the section on YAML files:
- It is possible to include malicious code in Docker images
- It is possible for people producing images to unknowingly include software in them with security vulnerabilities
This article goes deeper into the potential security vulnerabilities of containers and here is a detailed breakdown of security features currently within Docker, and how they function. The best advice for using images built by others is, as usual, only download and run something on your machine if it comes from a trusted source. Docker Hub has "official image" badges for commonly used, verified images as shown here:
Installing Docker
Installers for Docker on a variety of different systems are available here. Detailed installation instructions are also available for a variety of operating systems such as Ubuntu, Debian, Macs, and Windows.
Key commands
Here are a few key commands for creating and working with containers.
- To build an image from a Dockerfile go to the directory where the Dockerfile is and run:
sudo docker build --tag image_name . - To list the images on your system use
sudo docker image ls - To remove an image run
sudo docker rmi image_name - To open a container from an image run
Thesudo docker run -i -t image_name-i -tflags automatically open up an interactive terminal within the container so you can view and interact with the project files. - To exit an interactive terminal use the command
exit. - To get a list of active containers with IDs run
sudo docker container ls - There are also three main commands used for changing the status of containers:
- Pausing suspends the process running the container.
Containers can be unpaused by replacingsudo docker pause container_IDpausewithunpause. - Stopping a container terminates the process running it. A container must be stopped before it can be deleted.
A stopped container can be restarted by replacingsudo docker stop container_IDstopwithrestart. - If
stopdoes not work containers can be killed usingsudo docker kill container_ID
- Pausing suspends the process running the container.
- To remove a container run
sudo docker rm container_ID
Writing Dockerfiles
Let's go through the anatomy of a very simple Dockerfile:
# Step 1: Set up the computational environment

# Set the base image
FROM ubuntu:18.04

# Install packages needed to run the project
RUN apt-get update && \
    apt-get install -y --no-install-recommends python3.7 python3-pip && \
    rm -rf /var/lib/apt/lists/*
RUN python3 -m pip install numpy

#-----------------------

# Step 2: Include the project files in the image

# Copy files from the `project_files` directory on the machine building the image
# into the `project` folder in the container. This folder and any missing
# directories in its path are created automatically.
COPY project_files/ project/
This looks complicated, but most of the lines in this example are comments (which are preceded by #s), There are only
six lines of actual code. The first of these is a FROM statement specifying a base image. All Dockerfiles require a
FROM, even if it's just FROM SCRATCH. All the following commands in a Dockerfile build upon the base image to make a
functioning version of the researcher's project. Specifing a version for the image (18.04 in this case) is optional
but is best practice as it ensures that our Dockerfile remains valid after new releases of Ubuntu, which may not
include packages (or specific versions thereof) that we require later (for example python3.7).
It is worth spending time carefully choosing an appropriate base image as doing do can reduce the amount of work involved in writing a Dockerfile dramatically. For example a collection of images with the R programming language included in them can be found here. If a project makes use of R it is convenient to use one of these as a base image rather than spend time writing commands in your Dockerfile to install R.
The biggest block of lines comes next, it's a series of RUN statements, which run shell commands when building the
image. In this block they are used to install the software necessary to run the project. The first RUN block is a
chain of commands of this form:
RUN command_to_do_thing_1 \
   && command_to_do_thing_2 \
   && command_to_do_thing_3 \
   && command_to_do_thing_4
It is good practice to group related commands into a single RUN block to reduce the final size of your image by
avoiding the creation of unnecessary layers. We also follow best-practice by using --no-install-recommends to
avoid installing unnecessary packages
and cleaning up the apt cache, both of
which further reduce the size of Debian or Ubuntu images.
After we've installed Python we use another RUN statement to install a library required by our code.
Finally the COPY command is used to copy the project files from the machine building the image into the image itself.
The syntax of this command is COPY file_to_copy location_in_container_to_copy_to. In this example all the files in the
"project_files" directory are included in the "project" file in the container. Note that you can only copy files from
the directory where the Dockerfile is located, or subdirectories within it (in the example given here the
project_files subdirectory).
The ADD command has the same capabilities as COPY, but it can also be used to add files not on the machine building
the image. For example it can be used to include files hosted online by following ADD with a URL to the file. It is good
practice to use COPY except where ADD is specifically required as the term COPY is more explicit about what is
being done.
Here's what happens if a container is opened from an image called book_example built from the example above:
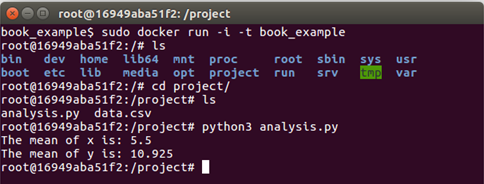
As you can see the directory "project" has been created, and if we look inside the project files "analysis.py" and "data.csv" have been copied into it. Because the software required for the project has already been included by the Dockerfile in the image the "analysis.py" script runs without any further software needing to be installed.
WORKDIR
This command can be used in Dockerfiles to change the current working directory. Commands that follow this in the
Dockerfile will be applied within the new working directory unless/until another WORKDIR changes the working directory.
When a container is opened with an interactive terminal the terminal will open in the final working directory. Here's a
simple example of a Dockerfile that uses WORKDIR, and the container it generates.
# Basic setup
FROM ubuntu
RUN apt-get update

# Make a directory called A
RUN mkdir A

# Make the working directory A
WORKDIR A

# Make two directories, one called B_1 and one called B_2
RUN mkdir B_1
RUN mkdir B_2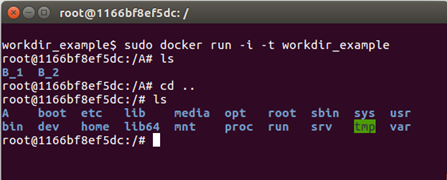
Directories B_1 and B_2 have been created within directory A.
WORKDIR should be used whenever changing directories is necessary when building an image. It may be tempting to use
RUN cd directory_name instead as this syntax will be more familiar to those that commonly work via the command line,
but this can lead to errors. After each RUN statement in a Dockerfile the image is saved, any following commands are
applied to the image anew. As an example here is what happens in the above example if the WORKDIR A line is swapped
for RUN cd A

All the directories have are in the top level in this case, rather than B_1 and B_2 being inside A. This is because the
image was restarted after the RUN cd A command and opened at the top (root) level by default, so that is where the
mkdir B_1 and mkdir B_2 commands took effect.
Other commands
Other commands that are sometimes used in Dockerfiles include:
CMD: This is used to run commands as soon as the container is opened. To clarify this is different to RUN commands which are commands run as part of setting up a container. For example to have a welcome message when a container is opened from the image CMD could be used as follows:
It's good practice to use CMD for any commands that need to be run before someone starts working in the container instead of forcing users to run them themselves (and trusting that they will even know that they need to).CMD ["echo","Welcome! You just opened this container!"]VOLUMES: These will be discussed later.MAINTAINER: information regarding the person that wrote the Dockerfile. Typically included at the top of a Dockerfile.EXPOSE: This includes ports that should be exposed, this is more relevant to people using Docker to share web apps.USER: Change the user that a command is run as (useful for dropping privileges).
Building images and .dockerignore files
As mentioned in the key commands section, to build an image open a terminal in the same directory as the Dockerfile to be used and run
sudo docker build --tag name_to_give_image .When an image is built everything in the Dockerfile's directory and below (this is called the "context") is sent to the Docker daemon to build the image. The daemon uses the Dockerfile and its context to build the image. If the context contains many large files which aren't needed for building the image (old datafiles, for example) then it is a waste of time sending them to the daemon, and doing do can make the process of building an image slow. Files can be excluded from the context by listing them in a text file called .dockerignore, and it is good practise to do so.
The files do not need to be listed individually in the .dockerignore file. Here is an example of the contents of a .dockerignore file:
*.jpg
**/*.png
data_files/*
file_to_exclude.txt
This excludes from the context:
- All jpg files in the same directory as the Dockerfile file
- All png files in the same directory as the Dockerfile file or any subdirectories within it
- All files within the data_files directory
- The file named "file_to_exclude.txt"
Sharing images
Docker images can be shared most easily via Docker Hub, which requires an account. Say two researchers, Alice and Bob, are collaborating on a project and Alice wishes to share an image of some of her work with Bob.
To do this Alice must:
- Write a Dockerfile to produce an image of her work
- Build the image. She (being inventive) calls it image_name
- Go to Docker Hub and sign up for an account. Say Alice (again, being inventive) chooses the username username_Alice
- Log into Docker Hub via the terminal on her machine using
sudo docker login - Tag the image of her project on her machine via the command line by supplying the name of the image and using the
pattern
username/image_name:version, so Alice runs the command:sudo docker tag image_name username_Alice/image_name:version_1 - Push the image to her Docker Hub account using
sudo docker tag push username_Alice/image_name:version_1 - Alice's image is now online and can be downloaded. Over to Bob...
Bob (assuming he already has Docker installed) can open a container from Alice's image simply by running
sudo docker run -i -t username_Alice/image_name:version_1Initially Docker will search for this image on Bob's machine, and when it doesn't find it it will automatically search Docker Hub, download Alice's image, and open the container with Alice's work and environment on Bob's machine.
Copying files to and from containers
Containers act much like virtual machines, as a result copying files into and out of them is not as trivial as copying files to different locations within the same computer is.
A file can be copied from the machine running a container into the container using:
sudo docker cp file_name container_ID:path_to_where_to_put_file/file_nameRecall that container IDs can be obtained using sudo docker container ls.
A file can be copied from within a container to the machine running the container by running the following command on the machine running the container:
sudo docker cp container_ID:path_to_file/file_name path_to_where_to_put_file/file_nameIf the second part (the path_to_where_to_put_file/file_name) is substituted for a . then the file will be copied to
whatever directory the terminal running the command is in.
Volumes
Every time a container is opened from an image that container is completely new. For example say a container is opened and work is done within it, files created, changed, deleted and so on. If that container is then closed and the image it came from is again used to start a container none of that work will be in the new one. It will simply have the starting state described in the image.
This can be a problem if a researcher wants to work in a container over a period of time, but there is a way around this using "volumes". These store work done within a container even after it is closed, and can then be used to load that work into future containers.
To create/use a volume run
sudo docker run -i -t --mount source=volume_name,target=/target_directory image_nameHopefully you will give your volume a more descriptive name than volume_name. A "target" directory is required, only work within this directory in the container which will be saved in the volume. Once the researcher is done they can close the container as normal. When they come back to the project and want to continue their work they just need to use the exact same command as above, and it will load the work contained in volume_name into the new container. It will save any new work there too.
Volume related commands:
- List volumes:
sudo docker volume ls - Delete a volume:
sudo docker volume rm volume_name - Delete all unattached volumes:
sudo docker volume prune - If, when deleting a container a
-vis included afterrminsudo docker rm container_IDany volumes associated with the container will also be deleted.
Singularity
Prerequisites: At present, Singularity only runs on linux systems (for example Ubuntu). If you use, macOS, Singularity Desktop for macOS is in "Alpha Preview" stage.
A major drawback of Docker for reproducible research is that it is not intended as a user-space application but as a tool for server administrators. As such it requires root access to operate. There is, however, no reason why the execution of an analysis should require root access for the user. This is especially important when computations are conducted on shared resource like HPC systems where users will never have root access.
The singularity container software was introduced to address exactly this issue. Singularity was created with HPC sytems and reproducible research in mind (see this video). It does not require root access to run (only to build container images!) and thus enables HPC users to locally build container images before running analyses, for example, on a high-performance cluster. As an added benefit, this makes it possible to use almost any software on an HPC system without having to bother admin staff with installing it. In recognition of the fact that Docker is the most well known containerization approach, singularity aims at maintaining compatibility with docker containers as much as possible, meaning that singularity can be used to run normal docker containers (without requiring root access!).
Singularity can be used to run Docker images or extend them by building new images based on docker containers as base layer. For instance, we could use singularity to spin up a vanilla ubuntu container and getting a shell in it using the ubuntu docker image via
singularity shell docker://ubuntu(type exit to leave the interactive shell again).
Just as docker images are built using Dockerfile files, singularity containers are built from singularity definition
files. The process and syntax is similar to docker files but there are subtle differences. As a minimal working example,
we can build a 'lolcow' container based on the official ubuntu docker container image. Put the following in a
lolcow.def file (based on the
Singularity documentation):
Bootstrap: docker
From: ubuntu

%post
    apt-get -y update
    apt-get -y install fortune cowsay lolcat

%environment
    export LC_ALL=C
    export PATH=/usr/games:$PATH

%runscript
    fortune | cowsay | lolcat
This 'recipe' uses a docker image as basis (ubuntu) installs a few apt packages, modifies a few environment
variables, and specifies the runscript (which is executed using the singularity run command). Details on the
singularity definition file format can be found in the official documentation.
A container image can then be built (requiring root!) via
sudo singularity build lolcow.simg lolcow.defThis will pull the ubuntu image from Docker Hub, run the steps of the recipe in the definition file and produce a single
output image file (lolcow.simg). Finally the runscript is executed as
singularity run lolcow.simgIdeally, you should see a nice ASCII cow and a few words of wisdom, as in
___________________________________
/ You will be called upon to help a \
\ friend in trouble.                /
-----------------------------------
       \   ^__^
        \  (oo)\_______
           (__)\       )\/\
               ||----w |
               ||     ||
Being HPC compatible, singularity containers are also supported by a wide range of workflow management tools. For example, both snakemake and nextflow support job-specific singularity containers. This makes singularity containers uniquely suited for parallelizing workflows on HPC systems using the widely used slurm workload manager. Using singularity containers and snakemake/nextflow is therefore a way of scaling reproducibility to massive scale and - as an added benefit - bringing workflows from a desktop machine to an HPC system no longer requires writing custom job submission scripts.
Long-term storage of container images
It is important to note that a mere container recipe file is not reproducible in itself since the build process depends on various (online) sources. Thus the same recipe file might lead to different images if the underlying sources were updated.
To achieve true reproducibility, it is therefore important to store the actual container images. For singularity images, this is particularly easy since an image is simply a large file. These can vary in size from a few tens of megabytes (microcontainers) to several gigabyte and are therefore not suited for being stored in a git repository themselves. A free, citable, and long-term solution to storing container images is zenodo.org which allows up to 50 Gb per repository. Since zenodo is minting DOIs for all content uploaded, the images are immediately citable. In contrast to Docker Hub (which also only accepts docker images) zenodo.org is also clearly geared towards long-term storage and discoverability via a sophisticated metadata system and thus ideally suited for storing scientific containers associated with particular analyses since these tend to not change over time.
Words of Warning
Even though singularity and docker might look similar, they are conceptually very different. Besides the obvious fact that singularity does not require root access to run containers, it also handles the distinction between the host and container file system differently. For instance, by default singularity includes a few bind points in the container, namely:
$HOME/sys:/sys/proc:/proc/tmp:/tmp/var/tmp:/var/tmp/etc/resolv.conf:/etc/resolv.conf/etc/passwd:/etc/passwd$PWD
Note, $PWD comes in handy since it implies that all files in the working directory are visible within the container.
Binding $HOME by default, however, also implies that software using configuration files from $HOME might behave in
an unexpected way since the image specific configuration files are overwritten with the current users settings in
$HOME. While this behaviour is handy in HPC scenarios, it is potentially dangerous for reproducible research. To avoid
potential issues, any software installed in a singularity container should be pointed to a global, user-independent
configuration files.